1. Update your OS (Ubuntu 16.04.3 LTS).
sudo apt-get update
2. Install PHP
sudo apt-get install php
3. Command to verify the php version:
php -v
o/p:
PHP 7.0.30-0ubuntu0.16.04.1 (cli) ( NTS )
Copyright (c) 1997-2017 The PHP Group
Zend Engine v3.0.0, Copyright (c) 1998-2017 Zend Technologies
with Zend OPcache v7.0.30-0ubuntu0.16.04.1, Copyright (c) 1999-2017, by Zend Technologies
4. Install Apache Web Server
sudo apt-get install apache2
5. Command to verify the apache2 version:
apache2 -v
o/p:
Server version: Apache/2.4.18 (Ubuntu)
Server built: 2018-04-18T14:53:04
6. Verify Apache2 running
Open your web browser and type "localhost". You will see "Apache2 Ubuntu Default Page"

7. Verify PHP working
a. Open Terminal and navigate to /var/www/html directory.

b. Type, sudo nano info.php and press Enter.
c. Above command will create a new file named "info.php" inside /var/www/html directory. Paste below code snippet and save the file using Ctrl+O, Enter and Ctrl+X keys:
<?php
phpinfo();
?>
d. Open your browser and enter "localhost/info.php". You will see below page.

e. If you see a blank page then execute below command and repeat step d again.
sudo apt-get install libapache2-mod-php
8. Verify MySQL database working for PHP
a. For MySQL database connection, you need to install MySQL database first.
Please refer to below link:
http://gaurav3ansal.blogspot.com/2018/04/install-mysql-on-ubuntu.html
b. After installting MySQL database, execute below command:
sudo apt-get install php7.0-mysql
c. To verify MySQL database connection, edit your previously created info.php file inside /var/www/html directory and enter below code snippet and chane the database_name and database_password and save the file using Ctrl+O, Enter and Ctrl+X keys:
<?php
phpinfo();
echo("<p>PHP is working</p>");
$ses = mysqli_connect("localhost","your_database_username","your_database_password");
if(!$ses){
echo("<p>Connection to content server failed.</p>");
exit();
}
echo("<p>Database Connected</p>");
?>
d. Verify MySQL database connection
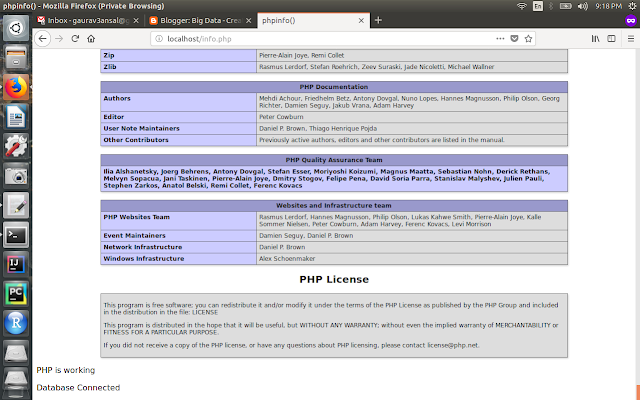
Open your browser and enter "localhost/info.php". You will see below page with a line "Database Connected" at the end of the page.
9. Install phpMyAdmin
sudo apt-get install phpmyadmin
10. Verify and open phpMyAdmin
Open your browser and enter "localhost/phpmyadmin". You will see below page.

Note: If you're not able to see the login page for phpmyadmin then execute command "sudo -H nano /etc/apache2/apache2.conf" to open apache.conf file located at "/etc/phpmyadmin" and enter the below line at the end of the file:
Include /etc/phpmyadmin/apache.conf
Note: I is Uppercase in above command
And restart apache2 service using command:
sudo service apache2 restart
Use your MySQL username and password to login into phpmyadmin.

sudo apt-get update
2. Install PHP
sudo apt-get install php
3. Command to verify the php version:
php -v
o/p:
PHP 7.0.30-0ubuntu0.16.04.1 (cli) ( NTS )
Copyright (c) 1997-2017 The PHP Group
Zend Engine v3.0.0, Copyright (c) 1998-2017 Zend Technologies
with Zend OPcache v7.0.30-0ubuntu0.16.04.1, Copyright (c) 1999-2017, by Zend Technologies
4. Install Apache Web Server
sudo apt-get install apache2
5. Command to verify the apache2 version:
apache2 -v
o/p:
Server version: Apache/2.4.18 (Ubuntu)
Server built: 2018-04-18T14:53:04
6. Verify Apache2 running
Open your web browser and type "localhost". You will see "Apache2 Ubuntu Default Page"

7. Verify PHP working
a. Open Terminal and navigate to /var/www/html directory.
b. Type, sudo nano info.php and press Enter.
c. Above command will create a new file named "info.php" inside /var/www/html directory. Paste below code snippet and save the file using Ctrl+O, Enter and Ctrl+X keys:
<?php
phpinfo();
?>
d. Open your browser and enter "localhost/info.php". You will see below page.

e. If you see a blank page then execute below command and repeat step d again.
sudo apt-get install libapache2-mod-php
8. Verify MySQL database working for PHP
a. For MySQL database connection, you need to install MySQL database first.
Please refer to below link:
http://gaurav3ansal.blogspot.com/2018/04/install-mysql-on-ubuntu.html
b. After installting MySQL database, execute below command:
sudo apt-get install php7.0-mysql
c. To verify MySQL database connection, edit your previously created info.php file inside /var/www/html directory and enter below code snippet and chane the database_name and database_password and save the file using Ctrl+O, Enter and Ctrl+X keys:
<?php
phpinfo();
echo("<p>PHP is working</p>");
$ses = mysqli_connect("localhost","your_database_username","your_database_password");
if(!$ses){
echo("<p>Connection to content server failed.</p>");
exit();
}
echo("<p>Database Connected</p>");
?>
d. Verify MySQL database connection
Open your browser and enter "localhost/info.php". You will see below page with a line "Database Connected" at the end of the page.

9. Install phpMyAdmin
sudo apt-get install phpmyadmin
10. Verify and open phpMyAdmin
Open your browser and enter "localhost/phpmyadmin". You will see below page.

Note: If you're not able to see the login page for phpmyadmin then execute command "sudo -H nano /etc/apache2/apache2.conf" to open apache.conf file located at "/etc/phpmyadmin" and enter the below line at the end of the file:
Include /etc/phpmyadmin/apache.conf
Note: I is Uppercase in above command
And restart apache2 service using command:
sudo service apache2 restart
Use your MySQL username and password to login into phpmyadmin.

